Godot AI गेम डेवलपमेंट
Updated 2026-09-05
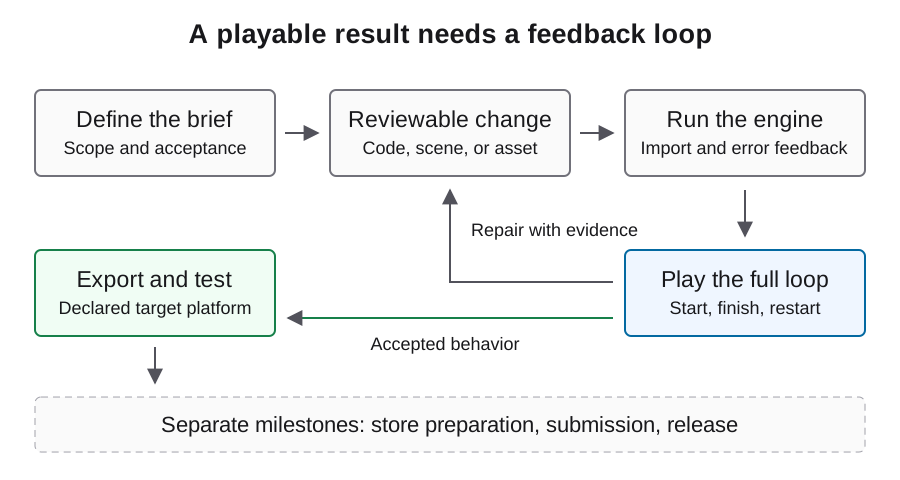
Project edits से playable loop और tested export तक जाने के लिए Godot CLI feedback का उपयोग करें। Imports, scene behavior और packaging को अलग चरणों में inspect करें।
Edits से पहले project boundary तय करें
Owned project directory और अनुमत changes की लिखित सूची से शुरुआत करें। Existing scenes, scripts, assets और plugins की inventory बनाएँ, ताकि agent दूसरी implementation बनाने के बजाय मौजूदा structure बढ़ाए। Initial project state को recoverable रखें और record करें कि कौन-सा engine binary इसे खोलता है।
स्पष्ट transitions वाला modest playable slice चुनें। उदाहरण के लिए, title screen से एक room और फिर win या loss के माध्यम से वापस आने वाला loop repeatable test देता है। Visual composition और controls की समीक्षा कौन करेगा, यह तय करें, क्योंकि सफल parser या model का completion message यह साबित नहीं करता कि experience coherent लगता है।
Executable और supported arguments पहचानें
Godot की stable CLI documentation नीचे दिए commands देती है। GODOT_BIN और PROJECT इस उदाहरण के लिए चुने गए shell variables हैं, Godot settings नहीं; placeholder paths को अपने existing executable और project से बदलें। Project path में project.godot होना चाहिए।
अतिरिक्त flags script करने से पहले version और help output capture करें। इससे यह मान लेने से बचेंगे कि वर्तमान online documentation में उपलब्ध command आपके installed build में भी है। Binary identity को बाद के test results के साथ record करें और failure की जाँच के दौरान इसे stable रखें। ये illustrative commands documented CLI forms का उपयोग करते हैं।
GODOT_BIN="/absolute/path/to/godot"
PROJECT="/absolute/path/to/project"
"$GODOT_BIN" --version
"$GODOT_BIN" --help
"$GODOT_BIN" --headless --path "$PROJECT" --import
Import, parsing और actual play को अलग रखें
Headless import asset-processing boundary जाँचता है। Parser check script की जाँच करता है। Normal launch game तक पहुँचकर scene wiring और runtime problems दिखा सकता है। Review record में इन तीनों के outcomes अलग रखें; तीनों को tests passed कहकर एक साथ summarize न करें।
नीचे दिया illustrative script path आपके project में पहले से मौजूद होना चाहिए। Parser check जानबूझकर narrow है: इससे working collisions, responsive input या correct persistence सिद्ध नहीं होती। Edit के बाद बदले behavior और उसके ठीक पहले तथा बाद वाले transition को फिर चलाएँ। Generated helper functions के लिए बहुत-से isolated checks बनाने से अक्सर यह अधिक informative होता है।
"$GODOT_BIN" --headless --path "$PROJECT" \
  --script res://scripts/player.gd --check-only
"$GODOT_BIN" --path "$PROJECT" --debug
CLI tools या MCP का सोच-समझकर चुनाव करें
Shell-capable agent reviewed CLI sequence चला सकता है। Godot MCP एक अतिरिक्त project-maintained tool interface है, जिसका setup dedicated page पर है। दोनों में operator को write या process launch approve करने से पहले पता होना चाहिए कि कौन-सा project target हो रहा है।
Agent की model-provider settings को engine tooling से अलग रखें। Working local connection यह सिद्ध नहीं करती कि कोई खास model उपलब्ध है या compatible gateway की हर feature supported है। पहले सबसे छोटी अनुमत read स्थापित करें, फिर reversible scene change और उसके बाद ही authorized experiment में complete gameplay cycle चलाएँ।
Failures को पर्याप्त scene context दें
Interaction fail होने पर relevant scene tree, script, input action और पहला meaningful runtime error capture करें। Expected transition और observed state समझाएँ। Player move नहीं कर सकता, इतना कहना पर्याप्त नहीं; यह भी बताएं कि game में focus है या नहीं, input detect हो रहा है या नहीं और player की position बदलती है या नहीं।
उस evidence से जुड़ी छोटी proposed correction और explanation माँगें। लागू करने के बाद वही action फिर चलाएँ और restart तथा scene transitions में regressions देखें। केवल error गायब हो जाने के कारण repair स्वीकार न करें; affected feature disable करने से error हट सकता है जबकि मूल requirement अधूरी रहे।
Export prerequisites स्पष्ट रूप से तैयार करें
Export के लिए matching preset और installed export templates चाहिए। export_presets.cfg और resource inclusion की समीक्षा build से पहले करें। Export credentials private रखें। उदाहरण में preset name illustrative है और आपके project से match होना चाहिए; output directory पहले से मौजूद होनी चाहिए।
Missing template या preset को environment problem मानें, generated game logic के गलत होने का evidence नहीं। Export logs और artifact hash सुरक्षित रखें, ताकि target-platform findings किसी specific build से जुड़ी रहें। Successful export महत्वपूर्ण checkpoint है, लेकिन इससे delivered player का start होना या round पूरा करना सिद्ध नहीं होता।
"$GODOT_BIN" --headless --path "$PROJECT" \
  --export-release "Windows Desktop" "/absolute/existing-build-dir/game.exe"
Target पर delivery miniflow चलाएँ
जिस operating system को support करना है, उस पर exported game launch करें। Start, input, complete round, restart, settings और relaunch के बाद persistence test करें। हर result के साथ artifact identity, device context और observed outcome रखें। macOS पर बनाया export अपने आप Windows behavior verify नहीं करता।
Web target के लिए browser loading और runtime errors भी inspect करें और real input से canvas चलाएँ। Content visible है और जहाँ उचित हो वहाँ move करता है, यह verify करें। Intended hosting configuration test करें; local editor run browser resource loading और platform restrictions को cover करता है, ऐसा न मानें।
Inspect करने योग्य source project और native capture
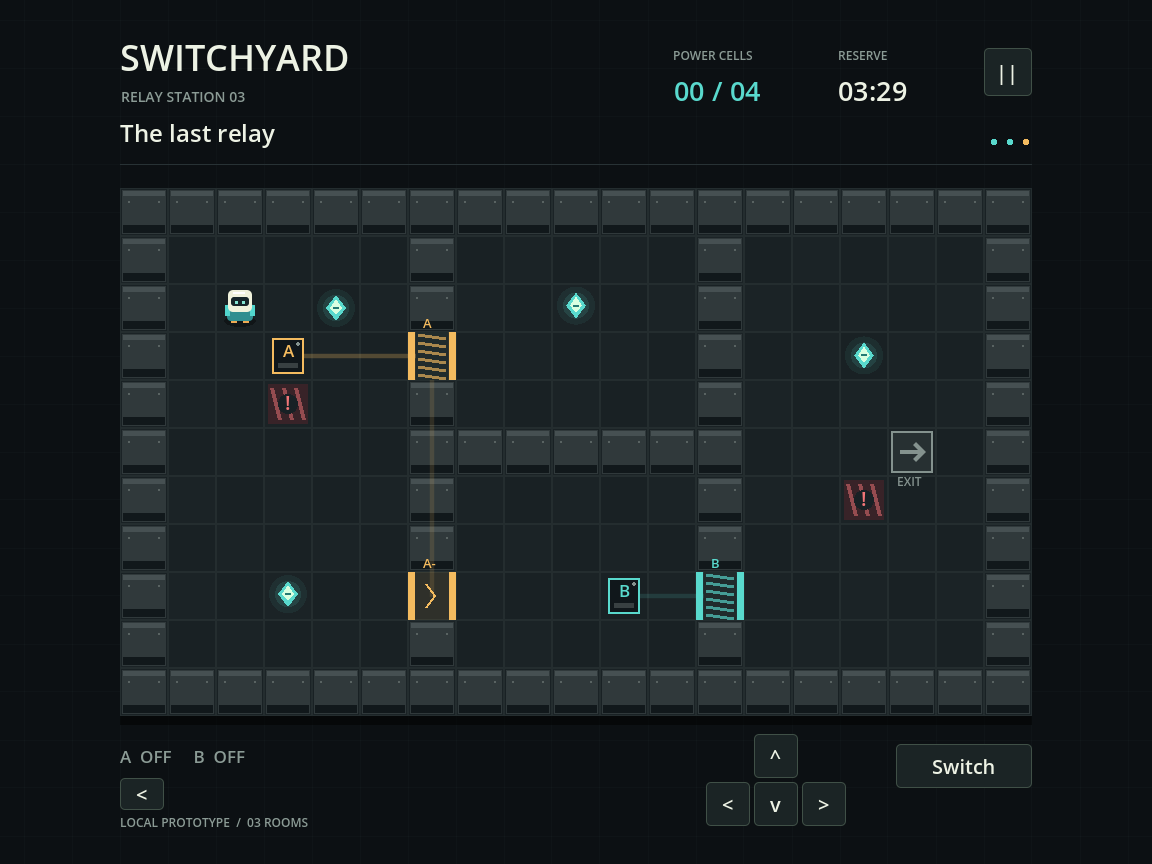
Local Switchyard example में three-room Godot puzzle, automated gameplay checks, save-reopen checks, raw logs, source ZIP और Godot PCK हैं। इसके native captures actual running project को दो viewport sizes पर दिखाते हैं। Screenshot से project को judge करने के बजाय documented commands दोहराना मजबूत check है।
Project ने Codex run में Godot 4.5.1 का उपयोग किया, लेकिन exact generation model verify नहीं हुआ। इसलिए यह local engine workflow दिखाता है, Astra benchmark नहीं। Missing export templates के कारण browser export blocked था और PCK standalone Windows executable नहीं है। ये सीमाएँ source के साथ दर्ज हैं, ताकि अगला developer जान सके कि क्या बाकी test करना है।
Review योग्य handoff से loop बंद करें
Handoff में playable scope, source identity, engine और template versions, build instructions, accepted results तथा unresolved defects लिखें। Tested artifact से authentic captures और shipped assets की provenance शामिल करें। Repair attempts और manual interventions सुरक्षित रखें; केवल अंतिम generated code dump प्रस्तुत न करें।
Basic loop स्वीकार हो जाने पर assets और localization को उनके अपने import तथा gameplay checks के साथ जोड़ें, फिर platform submission पर विचार करें। यह walkthrough engine documentation पर आधारित है; इसे अपने installed version पर लागू करें और actual results रखें। Reproduction steps वाली छोटी unresolved-issues list बनाएँ, ताकि अगला development session उसी ज्ञात state से शुरू हो।
अक्सर पूछे जाने वाले प्रश्न
क्या headless import gameplay test है?
नहीं। यह resource import को exercise करता है। Input, visuals, state transitions और persistence के लिए अपने observed checks चाहिए।
क्या export template को editor executable की तरह उपयोग कर सकता हूँ?
Documented export command के लिए Godot editor binary उपयोग करें। Export templates अलग prerequisite हैं, editor का replacement नहीं।
Export preset resolve क्यों नहीं हो रहा?
जाँचें कि उसका नाम spaces समेत export_presets.cfg से exactly match करता है और आपने intended project directory चुनी है।
Agent को commands कहाँ चलाने चाहिए?
Explicit owned project path और selected engine executable का उपयोग करें। दूसरे terminal में active किसी भी directory या binary पर निर्भर न रहें।
सबसे छोटा उपयोगी acceptance flow क्या है?
Title से launch करें, main action चलाएँ, round पूरा करें, restart करें और persistence जाँचने के लिए relaunch करें। Game में नया behavior जुड़ने पर इसे बढ़ाएँ।