AI-generated games debug करें
Updated 2026-09-05
पहले fail होने वाली boundary खोजें, agent को reproducible symptom दें और वही player action फिर test करें। जिस engine और build को वास्तव में चलाते हैं, वहीं से शुरुआत करें।
Fix माँगने से पहले failure classify करें
सबसे पहले fail होने वाला step पहचानें: project discovery, import, parsing या compilation, scene startup, player input, gameplay state, export या target launch। बाद के symptoms पहले failure के परिणाम हो सकते हैं। Engine version, project revision, target और exact reproduction साथ रखें।
उदाहरण के लिए, जो scene कभी start ही नहीं हुआ वह restart button के काम करने की जानकारी नहीं दे सकता। Browser game package fetch न कर पाए तो controller test नहीं हो सकता। Code बदलने से पहले error को सही boundary तक route करें; इससे original prerequisite टूटी रहते हुए repair loop में unrelated patches जमा नहीं होंगे।
| Symptom | पहले inspect करें | Retest outcome |
|---|---|---|
| Project open नहीं होता | Path, version, dependencies | Expected project load होता है |
| Blank scene | Startup errors, scene, camera, visibility | Expected content दिखाई देता है |
| Input का असर नहीं होता | Focus, action mapping, state, handlers | Action game state बदलता है |
| Export fail होता है | Preset या target prerequisites | Artifact बनता है |
| Build केवल target पर fail होता है | Packaged resources और platform logs | Target वही loop पूरा करता है |
पहला meaningful engine error capture करें
Godot में debugger panel और relevant runtime output उपयोग करें। Unity में compilation और runtime errors को अलग inspect करें और play results समझने से पहले editor ready होने दें। Failing script और उसे trigger करने वाले operation की पहचान करने वाला stack या location सुरक्षित रखें।
Agent को focused excerpt के साथ relevant scene या object context दें। बहुत बड़ा undifferentiated log first error को छिपा सकता है, इसलिए उससे बचें, लेकिन पूरा record local inspection के लिए रखें। Credentials और personal data redact करें। उपयोगी report में लिखें कि player ने क्या किया, क्या होना चाहिए था और engine ने वास्तव में क्या report किया।
Requirement बदले बिना reproduction छोटा करें
Recoverable project state से शुरू करें और उस smallest scene या action को isolate करें जिसमें defect अभी भी दिखाई देता है। Problem से जुड़े real controller, collision rule या save boundary को रखें। Failing system पूरी तरह हटाने से clean run मिल सकता है, लेकिन वह वही behavior हटा देगा जिसे ठीक करना था।
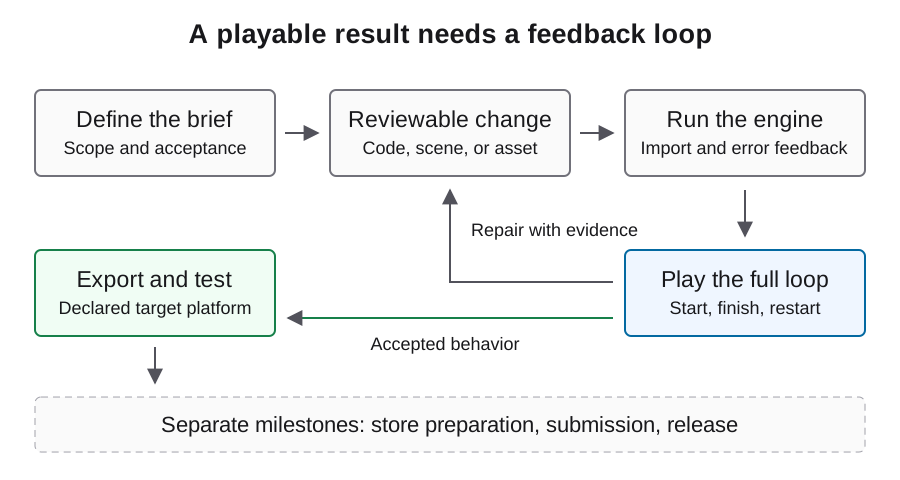
नीचे दिया brief original diagnostic template है। इसे observed details से भरें, model से cause assume न कराएँ। एक proposed explanation और narrowly scoped change माँगें। Test पूरा होने पर full player journey में लौटें, ताकि local repair टूटा scene transition छिपा न दे।
Project revision: <record actual revision>
Engine and target: <record actual environment>
Steps: launch -> start round -> perform the failing action
Expected state: <specific result>
Observed state: <specific result>
First engine error: <relevant error and location>
Inspect the referenced scene and script before editing.
Propose one cause, make a scoped fix, then repeat these steps.
Preserve the required behavior and report any remaining failure.
Blank screen को layers में investigate करें
पहले तय करें कि engine start हुआ और intended scene load हुआ। फिर camera selection, viewport dimensions, object visibility, positions और scene को ढकने वाले overlay inspect करें। Engine state और real capture साथ उपयोग करें: image अकेले यह नहीं दिखा सकती कि scene paused है, camera से बाहर है या empty है।
Input दें और देखें कि कुछ state बदलती है या नहीं, भले कुछ दिखाई न दे। Position बदले लेकिन image न बदले तो rendering या scene references पर ध्यान दें। दोनों न बदलें तो artwork adjust करने से पहले startup और input जाँचें। हर hypothesis को observation से जोड़ें, ताकि agent दोनों systems को अनावश्यक रूप से rewrite न करे।
Input को gameplay transition के आर-पार trace करें
Action को focus और mapping से उसके handler तक, फिर उस state तक follow करें जिसे उसे बदलना है। Movement math को दोष देने से पहले pause state और UI interception जाँचें। Restart failure missing handler, stale scene reference या कभी reset न हुई state हो सकता है।
Repair के बाद action को एक से अधिक relevant states में test करें: first launch, win के बाद और जहाँ लागू हो loss के बाद। Repeated rounds के बाद दिखने वाले duplicated handlers या stale objects जाँचें। छोटा complete miniflow इन lifecycle defects को button को अकेले बार-बार test करने से बेहतर localize कर सकता है।
Browser loading को game logic से अलग रखें
Godot web export के लिए gameplay code edit करने से पहले browser network और console panels inspect करें। Confirm करें कि exported HTML, JavaScript, WebAssembly और game package intended location से load हो रहे हैं। चुने हुए thread configuration की requirements सहित hosting settings को official web export documentation से मिलाएँ।
Exported companion filenames consistent रखें और पुराने तथा नए files के मिश्रण के बजाय artifact test करें। Wrong project दिखे तो test browser में service-worker caching inspect करें। फिर input exercise करें और moving content verify करें। Nonblank canvas initial rendering check है, game loop काम करने का proof नहीं।
Target पर export-specific failures जाँचें
Editor काम करे लेकिन distributed build fail हो तो startup scene selection, included resources, configuration और target logs compare करें। Exact artifact hash सुरक्षित रखें, ताकि बाद का re-export reproduction record को invalidate न करे। Existing saves या editor caches पर निर्भर करने से पहले clean starting state में test करें।
Missing packaged file ठीक करने के लिए core mechanic न बदलें। Packaging boundary ठीक करें और target build में वही acceptance path फिर चलाएँ। Desktop artifacts के लिए actual operating system उपयोग करें; browser artifacts के लिए intended browser और hosting setup। केवल cross-exporting से target behavior सिद्ध नहीं होता।
Before-and-after result के साथ repair बंद करें
Failing reproduction, scoped diff और वह repeated action सुरक्षित रखें जो अब expected state देता है। Defect पैदा करने वाली boundary पर regression check जोड़ें, फिर surrounding game loop दोहराएँ। Manual corrections और unsuccessful repairs में consumed requests record करें।
यहाँ के examples diagnostic procedures हैं, published failure-and-fix case नहीं। इनका उपयोग अपने project से concrete report बनाने के लिए करें। Repeated proposals के बाद भी वही symptom रहे तो automatic loop रोकें और missing observation जुटाएँ; बिना नए evidence broad rewrite न करें।
अक्सर पूछे जाने वाले प्रश्न
Agent कहता है game fix है, लेकिन screen blank है। अब क्या?
Symptom reproduce करें और startup errors, active scene, camera तथा input response inspect करें। Completion message runtime observation नहीं है।
क्या पूरा project फिर generate करना चाहिए?
पहले earliest failing boundary isolate करें और working state सुरक्षित रखें। कई systems बदलने वाले replacement की तुलना में focused reproduction review करना आम तौर पर आसान होता है।
Browser पुराना game क्यों दिखाता है?
Test browser में artifact identity, served files और service-worker cache जाँचें। Verify करें कि current export ही वास्तव में load हो रहा है।
क्या passing script checks playability सिद्ध करते हैं?
वे executed checks को cover करते हैं। Scene wiring, input, rendering, state transitions और persistence के लिए runtime evidence चाहिए।
Useful bug report में क्या शामिल होना चाहिए?
Project और engine identity, target, steps, expected तथा observed states, पहला relevant error और reproduce करने के लिए आवश्यक सबसे छोटी scene या files।