Unity AI गेम डेवलपमेंट
Updated 2026-09-05
अपने मौजूदा Unity project का उपयोग करें, एक review योग्य gameplay बदलाव करें और उसे compilation, tests, play तथा target build तक ले जाएँ।
मौजूदा project contract से शुरुआत करें
Agent को write access देने से पहले चुने हुए Unity editor, project path, target platform, packages और rendering setup की पहचान करें। Project version और dependency locks को experiment record के साथ रखें। सुनिश्चित करें कि operator के पास आवश्यक editor access और target modules हैं; model access ये prerequisites उपलब्ध नहीं करा सकता।
Project की स्थापित conventions का उपयोग करते हुए एक छोटा playable scene परिभाषित करें। यदि team के पास पहले से character controller या input abstraction है, तो replacement सुझाने से पहले agent से उसका निरीक्षण कराएँ। इससे generated changes की समीक्षा की जा सकेगी और दिखने में अलग prototype उन systems को bypass नहीं करेगा जिन पर बाकी game निर्भर है।
Editor automation को अलग connection मानें
CoplayDev का Unity MCP project compatible clients के लिए editor operations उपलब्ध कराता है। इसकी installation guide editor package और server connection बताती है। Agent की model service अलग है: model credentials बदलने से अनुपलब्ध editor instance ठीक नहीं होगा।
Read-only project inspection से शुरुआत करें और पुष्टि करें कि request किस खुले instance को मिल रही है। Mutation approvals को disposable scene या स्पष्ट रूप से owned feature तक सीमित रखें। Tool का सफल लौटना केवल यह बताता है कि operation अपनी boundary पर पूरा हुआ; resulting scene में references गलत हो सकते हैं या play के दौरान fail हो सकती है। Dedicated MCP guide connection checks और version recording समझाती है।
दिखने वाले परिणामों वाले सीमित बदलाव माँगें
हर failure के बाद पूरी scene rewrite माँगने के बजाय controller adjustment, एक menu transition या छोटा persistence feature माँगें। बताएं कि player को क्या करना है, कौन-सी state बदलनी चाहिए और परिणाम कैसे देखा जाएगा। Generated modifications स्वीकार करने से पहले पिछली working state सुरक्षित रखें।
सीमित बदलाव और उसके review criteria तय करने के लिए नीचे दिए illustrative brief का उपयोग करें। Scenes और prefabs के लिए object references तथा saved state को script diffs के साथ inspect करें; केवल source file में वह configuration नहीं हो सकती जो gameplay तय करती है। Editing से पहले agent से affected objects की पहचान कराएँ।
Inspect the selected project and its existing input and controller code.
Add one restart transition to the owned gameplay scene.
Keep package versions and rendering settings unchanged.
Report changed scripts, scene references, and the verification performed.
Stop before package downloads, purchases, external uploads, or publishing.
Play results समझने से पहले compilation पूरा होने दें
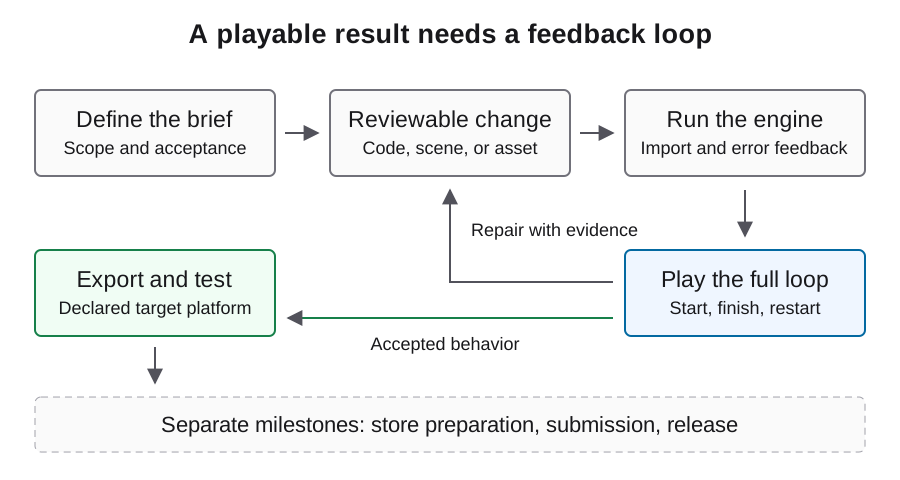
Observation log में code compilation, editor readiness और gameplay को अलग रखें। Compilation fail हो तो सबसे पहला relevant error और बदला हुआ source context capture करें। जब editor intended scripts load नहीं कर सकता, तब movement tuning न माँगें; इससे invalid baseline पर अतिरिक्त edits बनेंगी।
Compilation के बाद play शुरू करने से पहले expected components और references जाँचें। Correction के बाद वही player action दोहराएँ। Error-free console उपयोगी evidence है, लेकिन game को फिर भी intended state तक पहुँचना चाहिए। बार-बार बदलाव के बाद symptom न बदले तो बड़े replacement के बजाय छोटी reproduction शुरू करें।
Project test framework का सोच-समझकर उपयोग करें
Unity Test Framework command-line test selection और results output को document करता है। यह उदाहरण मानता है कि framework पहले से configured है और test result directory मौजूद है। UNITY_BIN और PROJECT illustrative shell variables हैं, जो मौजूदा editor और project की ओर संकेत करते हैं। Reference documentation को अपने installed package से मिलाएँ।
उपयुक्त isolated logic के लिए EditMode checks और execution की आवश्यकता वाले behavior के लिए PlayMode checks चलाएँ। ये categories controls और presentation की hands-on review का स्थान नहीं लेतीं। Test counts, failures और result files को test की जा रही revision के साथ रखें। जिस run में कोई test discover ही न हो, उससे game के पास होने का प्रमाण नहीं मिलता।
UNITY_BIN="/absolute/path/to/Unity"
PROJECT="/absolute/path/to/project"
"$UNITY_BIN" -batchmode -projectPath "$PROJECT" \
  -runTests -testPlatform EditMode \
  -testResults "/absolute/existing-results-dir/editmode.xml" \
  -logFile "/absolute/existing-results-dir/editmode.log"
Player बनाने से पहले build inputs की समीक्षा करें
Build में project का reviewed scene selection और target configuration होना चाहिए। यह न मानें कि editor में अभी खुला scene ही startup पर शामिल किया जाएगा। Build identity और logs सुरक्षित रखें, ताकि बाद के failures को exact artifact से जोड़ा जा सके।
Unity CLI मौजूदा static editor method को -executeMethod के माध्यम से call कर सकता है। यह flag build implementation नहीं बनाता: project में explicit build behavior और failure handling वाली वास्तविक method चाहिए। ऐसे invented sample methods के बजाय team के मौजूदा build entry point को प्राथमिकता दें जो runnable दिखती हैं लेकिन project में मौजूद नहीं होतीं।
Editor के बाहर gameplay validate करें
Delivered player को घोषित operating system पर अपेक्षित controls और clean starting state के साथ test करें। पहली screen से प्रवेश करें, एक round पूरा करें, restart करें, settings बदलें और relaunch करें। केवल window खुलने की जाँच के बजाय persistence और transitions को acceptance brief से मिलाएँ।
उस artifact से authentic screenshots और input-driven छोटा sequence record करें। यदि editor run पास हुआ लेकिन build fail होता है, तो agent से core gameplay rewrite कराने से पहले scene inclusion, resource dependencies और platform-specific behavior inspect करें। जो boundary बदली है, वही cause का उपयोगी संकेत है।
Human work और unresolved dependencies track करें
Manual inspector changes, asset edits, जोड़ी गई instructions और environment repairs को intervention record में रखें। Model usage न बनने पर भी ये production effort का हिस्सा हैं। Cost review करते समय text coding calls को image generation, engine work और target-device testing से अलग रखें।
यह documentation-backed walkthrough आपके चुने हुए editor और package versions के विरुद्ध validate किया जाना चाहिए। Handoff में सबसे छोटा complete workflow रखें: connection, change, compilation, play और export। जब दूसरा developer इसे दोहरा सके, तो अगले feature के लिए यही baseline उपयोग करें और dependency या build target बदलने पर check फिर चलाएँ।
अक्सर पूछे जाने वाले प्रश्न
क्या Unity MCP मेरा model चुनता है?
नहीं। यह editor tool connection देता है। आपका agent client model access और authentication अलग से तय करता है।
क्या command-line tests gameplay review की जगह ले सकते हैं?
वे केवल discovered और executed tests को cover करते हैं। Player controls, visual clarity और target-platform behavior के लिए अभी भी उपयुक्त runtime checks चाहिए।
Universal build command क्यों नहीं दिया गया है?
Build project scenes, target settings और उपलब्ध build entry points पर निर्भर करते हैं। Invented executeMethod target से runnable example नहीं बनता।
क्या मैं अलग editor version के लिए वही Unity setup फिर उपयोग कर सकता हूँ?
Package compatibility फिर जाँचें और पिछली working state सुरक्षित रखें। Upgrade experiment environment बदलता है और अपनी verification माँगता है।
Editor play काम करे लेकिन build fail हो तो क्या जाँचूँ?
Startup scene selection, packaged resources, target configuration और platform logs की तुलना करें। Exact exported artifact में वही player action दोहराएँ।